Trilogy is for sale for and listed with Boatshed.com at this link:
https://www.boatshed.com/dosearch.php?bq={}&q=ranger%20tug%2027
Why? We needed a larger cruising platform with the addition of our dog, Maggie, that could also be a floating "apartment" when we leave our home on Hat Island and visit the grandchildren. We now have a Camano 31.
https://www.boatshed.com/dosearch.php?bq={}&q=ranger%20tug%2027
Why? We needed a larger cruising platform with the addition of our dog, Maggie, that could also be a floating "apartment" when we leave our home on Hat Island and visit the grandchildren. We now have a Camano 31.
Rather than looking for and finding a boat, this 2012 Ranger tug found us by speaking to both Laurie and I. The name Trilogy would come after the sale and was chosen because this was our third Ranger Tug and our third adventure on the east coast. It also symbolizes the continuation of our boating adventures.
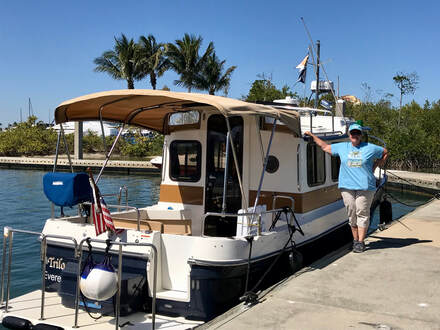
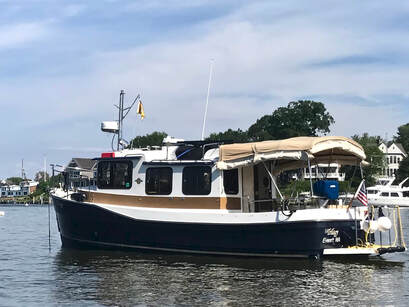
This photo shows the style of the classic Ranger 27 with an inboard diesel. We were familiar with it because it is an improvement over the Ranger 25 that we owned for 6 years. See my website, www.laurieann-ranger25.com
[Photo at Biscayne National Park, Florida]
On the pages that follow, you can discover the adventures where Trilogy took us including: the Tennessee River and Tenn-Tom Waterway, both coasts of Florida, the historic canals in New England and Canada, Chesapeake Bay, and the Atlantic Intra-Coastal Waterway. Also, there is a page about the maintenance, repairs and modifications that we made.
Performance: What Was Learned After 7,000 Miles & nearly 800 Hours Of Cruising
The Engine: The Yanmar 180 HP diesel is BMW engine block that was marinated by Yanmar. It has a quiet, slow cruising speed of 6.6 knots to 8 knots when the RPM is 2100 to 2400. According to Yanmar, only 10% of the cruising should be at more than 3200 RPM or more. Wide Open Throttle is 4000 RPM. The factory did the prop correctly for the boat because when fully loaded with fuel, water, people, and all the equipment, the engine will reach 4000 RPM.
Tip: if your boat's engine will not reach wide open throttle it is either overloaded or the prop is not the right pitch.
The most comfortable fast speed is 3600 RPM which is 12 to 13 knots or 14 MPH. Traditional diesel engine operations say the engine should run at the 80th percentile of load to keep the oil and block healthy. I run the engine for at least 10 minutes per hour at the fast cruising speed for that purpose and to keep the turbo exercised. For planning, we typically travel an average of 40 miles per day, or about 5 hours and use 10 gallons of fuel. The most miles traveled in one day was 93.
Trilogy's Fuel Mileage: 4 MPG at slow cruising and using 2.0 gallons per hour and 2.2 MPG at the fast cruising speed using 6.7 gallons per hour. The 100 gallon tank gives an easy cruising range of 240 statute miles with a 25% reserve.
TIPS, SKILLS AND LESSONS
Preparing To Get Underway
Waking up the boat's systems properly by paying attention to the details will create the foundation for a good cruise. The size and complexity of the boat will determine the depth of the detail to do.
Tip: Have a written checklist to refer to. On a high level, here is what I do:
Waking up the boat's systems properly by paying attention to the details will create the foundation for a good cruise. The size and complexity of the boat will determine the depth of the detail to do.
Tip: Have a written checklist to refer to. On a high level, here is what I do:
- Engine Room Checks. Do a slow overall look-see at the whole engine for anything out of place. Visually check the fluid levels of the coolant and oil. Remember the coolant level in the expansion tank should not be solely relied upon. Take off the radiator cap and look inside for coolant at the very top. Press on the serpentine belt - it should be tight. Open the raw water intake valve by exercising it several times. Do not assume that it is open. For our Ranger 27, the only way to know the level inside the holding tank is to see it by the engine. Check the bilge pump by briefly lifting up on the float switch.
- Start The Engine. I apply John Deere's instructions in addition to the one's by Yanmar. Start the engine at idle speed and immediately check the exhaust to ensure raw water is being pumped out, verify the proper oil pressure and voltage is 13.5 or more. The engine is allowed to only idle for 5 minutes or less. Otherwise, run it at 1400 RPM. Why? Diesels love to work to keep them lubricated and internally clean, do not be easy on them. Also, the alternator typically is creating the most amperage when it is above idle. Work the engine after the coolant's thermostat opens. Meaning, after leaving the dock, wait for the engine to get to its operating temperature, usually 180 to 190 degrees, before running it at maximum thrust.
- Electronics and Helm Controls. With the alternator supplying charging power to the batteries, turn on the VHF radio, chart plotter and depth sounder. Often, the GPS information for the satellites will take a minute or so receive and provide your location. Verify the volume on the VHF radio by tuning the squelch control and tune to Channel 16. Turn on and test the thruster. Check the steering helm by moving the rudder completely over to each side, then center the rudder.
- Ready the Cabin. Put anything that could fall over and break or spill in the sink. Check the cabinet doors and drawers are closed. Window coverings should be open. Room doors should be closed or secured so these do not swing.
- Wear the Safety Equipment. Put on your PFD, put on sunglasses and a hat if needed. Doing all of this before leaving is easier than looking for these while underway.
- Communicate the Plan. Assess what the wind and current is doing to the boat at the dock. Determine the order of releasing the lines and how to leave the dock. Communicate these to the crew and verify that you are understood. Tip: Repeat back what you are told verifies understanding. Example, when you are told there is log off the port bow. Say: "Got it, log off the port bow, now moving to starboard.
Lines and Knots
Lines is the boating word for rope. Lines and knots are important topics that boaters need to be comfortable with. To make cruising on smaller boats more comfortable, the number knots and lines you need to master is pretty short. There are books, videos, and courses that you should explore and learn from. My background in providing this information comes from growing up on sailboats, teaching Pioneering Merit Badge in Scouting, boating for 30 years and owning 9 boats, and being a Licensed Master for 50 tons.
Lines is the boating word for rope. Lines and knots are important topics that boaters need to be comfortable with. To make cruising on smaller boats more comfortable, the number knots and lines you need to master is pretty short. There are books, videos, and courses that you should explore and learn from. My background in providing this information comes from growing up on sailboats, teaching Pioneering Merit Badge in Scouting, boating for 30 years and owning 9 boats, and being a Licensed Master for 50 tons.
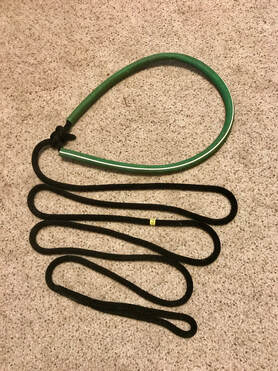
- Line Tip #1: Use double braided nylon yacht line for the boat's dock lines. 5/8" diameter is recommended. It is easy to work with, easy on the hands, and provides the amount of stretch to be a good shock absorber. 3-stranded line is by the big boats for dock lines because the line grabs well. Do not use braided line with solid core that is common at the big box stores. These do not have the strength and endurance needed. I am a fan of Top Knot (https://mooringlines.com) as a source for lines.
- Line Tip #2: Have bow and stern lines for both sides of the boat. These should be connected to a cleat and be ready to use. Too many times, I have seen boaters unprepared or unwilling to dock because they do not have lines ready.
- Line Tip #3: Length of lines depends on the purpose: Remember these guidelines are for smaller boats. Stern lines - about 1-1/2 of the boat's beam. Meaning a common 8'-6" beam would have a 12' long stern line. Bow lines - about 1-1/2 to 2 times the beam. Using the same example, would have 15' bow line. Spring lines are the underrated and under used champion of docking. A spring line is best connected halfway between the bow and stern. This line keeps the boat from moving forward or back. The Spring line should be close to less than the length of the boat. For a 27' boat, 25 feet of line is about right.
- Line Tip #4: Fender lines are 7/16" in diameter and 3' long.
- Line Tip #5: Have two fenders for each side and are ready to use
KNOTS: The number of knots that you need to know are few. Learning to use these knots will make you more comfortable because you can trust that the knot will hold. Yes, there are mechanical devices that may replace a knot but that means more stuff to store, remember where it is and to maintain it. Besides, boaters who know these few knots send the signal that you know what you are doing! Again, look for videos and instruction material to help you learn these. How to always remember knots: repetition. Tie each knot 17 times successfully and you will have it.
Great knots that have endured over time have three characteristics. 1) uses friction to be effective. Friction is surface contact either on the line itself or to a cleat or a rail. 2) is easy to tie. 3) does not fail. 4) can be un-tied easily even after being very tight.
Great knots that have endured over time have three characteristics. 1) uses friction to be effective. Friction is surface contact either on the line itself or to a cleat or a rail. 2) is easy to tie. 3) does not fail. 4) can be un-tied easily even after being very tight.
The Cleat Knot. The most commonly used and the most commonly one that is not done right. The cleat knot has two parts: securing to the cleat and locking the line to the cleat. You need to do both right. First, wrap the line ALL THE WAY AROUND the cleat in a complete circle. This is where most people, books and teachers get it wrong. They will almost make a circle but not quite. The power of the complete circle is the magic of a cleat knot. You can hold a boat that is under power by only making a complete circle and then keeping the line taut. The second part of the knot is locking the line over one horn, then flip the next loop over in a half twist and put one the other horn. The finished cleat knot looks flat.
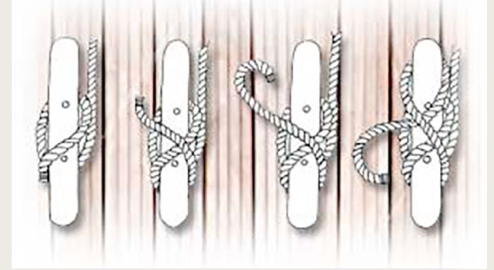
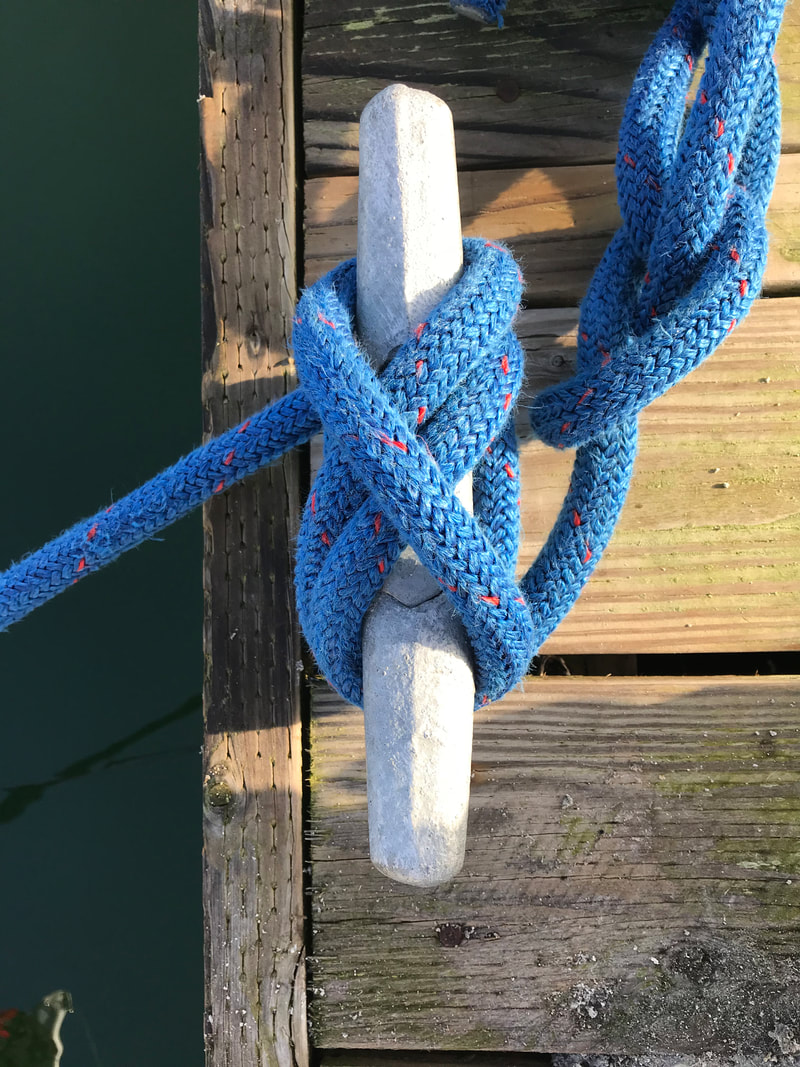
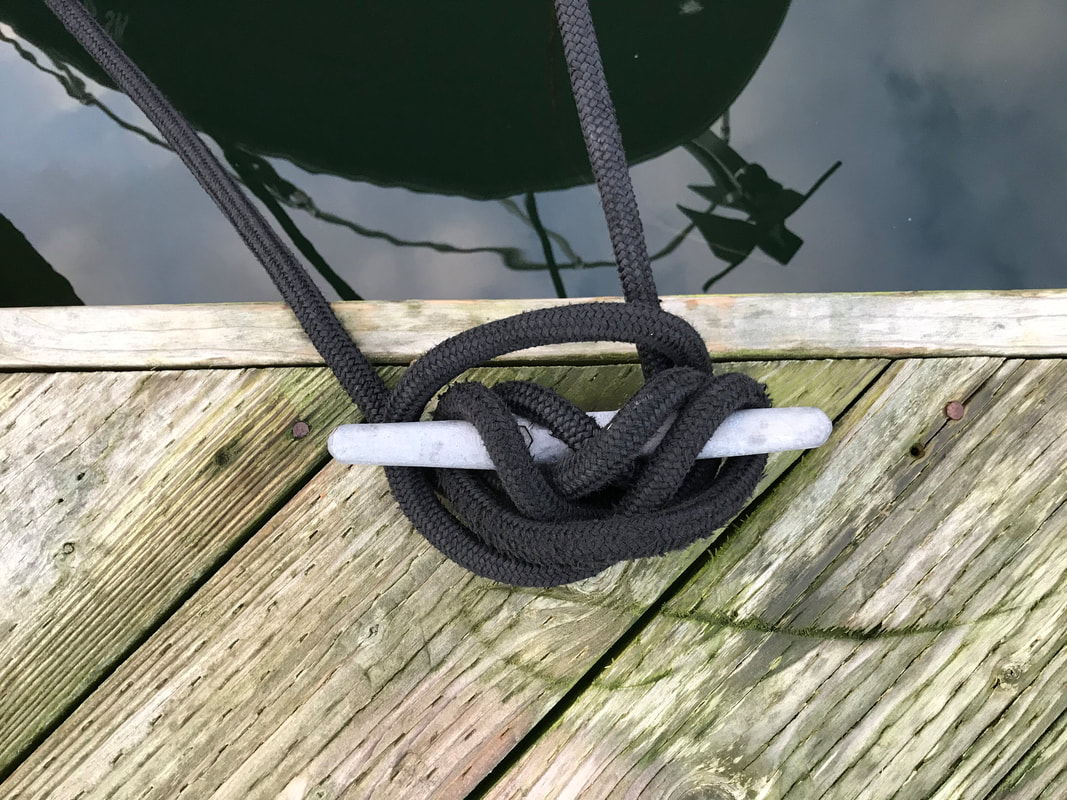
The Cleat Knot is not a way to store line. Below are examples are what NOT to do. Why? filling the cleat with line makes the knot harder to untie which comes into play if you need to get away from the dock quickly or easily.

Two Half Hitches. This is the most useful and versatile knot. Use Two Half Hitches to tie fenders to a rail, a dinghy to a pole, or your dog to the boat. It uses the principle of friction on itself. For it to work, the knot must be snug tight to itself. Keep Two Half Hitches from sliding on a smooth railing by wrapping the line two or three times around the rail (not on top of the line - remember surface friction). The steps:
- Pass the end of the rope around the object.
- Bring the end over and around the standing part of the rope, then back through the loop that has formed. This makes a half-hitch.
- Continue taking the end around the standing part of the rope to tie another half-hitch (this time outside the loop). Be sure to go around the standing part in the same direction.
- Pull the knot snug and slide it against the object.

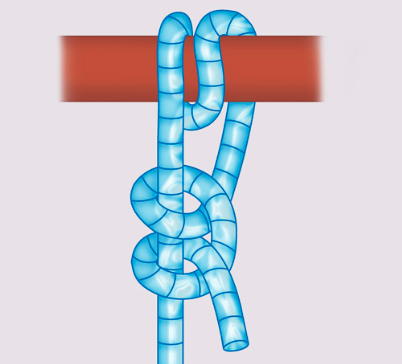
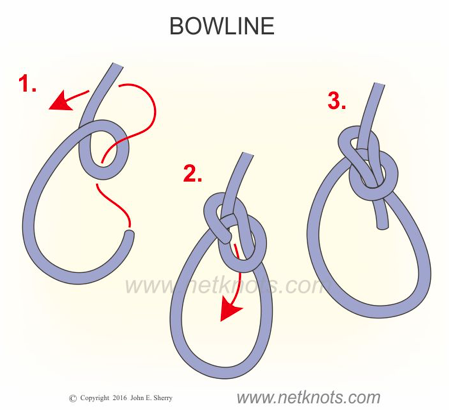
Bowline. This knot makes a loop that will not slip and will not let go. The Bowline (pronounced Bo-lin) is also a rescue knot. Make it for some in the water. Or, it can be tied using one-hand and use it for yourself. The steps:
- Lay the rope across your left hand with the free end hanging down. ...
- Bring the free end up to and pass through the eye from the under side (the rabbit comes out of the hole).
- Wrap the line around the standing line and back down through the loop (around the tree and back down the hole).
Docking
Boating skills are most prominently displayed while docking. Running the boat in open water is the easiest part of the boating experience. When I am coaching and training boaters, we spend more time at the helm developing slow speed skills. We safely dock using these rules and guidelines:
Docking Tip #1: Decide and visualize the right approach first.
Docking Tip #2: Make a wide turn into the slip
Docking Tip #3: Come to the dock at an angle, about the size of a slice of pie.
Docking Tip #4: Use the tool of Target Acquisition: "What you stare is where you will go." Keep your eyes focused on the target and the boat will go there.
Docking Tip #5: Smaller boats are light with a shallow draft. They are easily moved by wind, current and wakes. Find the balance between using a little power to control the boat and gliding without power to keep the speed down. Go only as fast as you are willing to hit the dock. Going too fast is the most common mistake boaters make; too fast means little control.
Docking Tip #6: Bow in to the dock first, then but the stern in and stop.
Docking Tip #7: See the section above on Line Tips.
Boating skills are most prominently displayed while docking. Running the boat in open water is the easiest part of the boating experience. When I am coaching and training boaters, we spend more time at the helm developing slow speed skills. We safely dock using these rules and guidelines:
- No jumping,
- No yelling,
- No fending off with a body part,
- Grab the first cleat from the cockpit. Jumping off the boat to grab a cleat should be avoided because it is dangerous to the crew and may push the boat away from the dock. Using the cleat grabber also makes single-handing the docking process safer.
- Every line is tied to something before leaving it even if is a quick tie knot,
- Tying off the boat has two parts, the quick secure and the final adjustments. You do not have to get the boat right the first time.
Docking Tip #1: Decide and visualize the right approach first.
Docking Tip #2: Make a wide turn into the slip
Docking Tip #3: Come to the dock at an angle, about the size of a slice of pie.
Docking Tip #4: Use the tool of Target Acquisition: "What you stare is where you will go." Keep your eyes focused on the target and the boat will go there.
Docking Tip #5: Smaller boats are light with a shallow draft. They are easily moved by wind, current and wakes. Find the balance between using a little power to control the boat and gliding without power to keep the speed down. Go only as fast as you are willing to hit the dock. Going too fast is the most common mistake boaters make; too fast means little control.
Docking Tip #6: Bow in to the dock first, then but the stern in and stop.
Docking Tip #7: See the section above on Line Tips.
Here are two articles about using single propeller. The first is from Sea Magazine the other is from DIY Boat Owner Magazine.
Handing and Steering Tips (without the thrusters)
Slow speed handling skills are the ones to practice and master. Do not become dependent on the thrusters. They are good for fine tuning - not doing the main work because these are small and powered with 12 volt motors. The stern thruster is particularly marginally effective.
The Ranger Tugs have narrow rudders which causes them to be slow to respond at low speeds. Effective steering and making tight turns at slow speed is done using a combination of the rudder all the way to port or starboard and applying the engine at idle speed. When wind or current makes using idle speed insufficient, Surge the engine by giving a short burst of throttle and quickly moving back to idle and neutral. Boats are not like cars, the stern moves before the bow. It is more like steering a wheel barrow. When surging is used with the rudder hard over, the result is effective, controlled turns.
Tight slow speed maneuvering means:
Steering Tip #1: Use this sequence to make tight and response turns: idle speed in neutral and glide, turn hard over, forward and surge.
Stern Kick. Giving a short burst of power while the rudder is turned hard will kick the stern over to the side before the boat moves forward. The stern kick is a useful tool with docking. Come in at an angle, with the bow very close in, do a stern kick to put the boat agains the dock. Because the propeller turns clockwise while in forward, turns to starboard will be quicker and tighter than turns to port when using the engine surging tactic with a stern kick. In fact, the tug can make a tight U-turn or be "walked" into a dock on the port side of tug by alternating forward then reverse while keeping the rudder hard to starboard and surging the engine.
Know when the rudder is centered. Do this by counting the wheel turns from port to starboard. On Trilogy, the steering wheel makes four full revolutions from side to side. Therefore, to center the rudder, I make two full revolutions from either port or starboard rudder position. Then adjust according after putting it in gear. Tip: Centering the rudder should be one of the steps before going underway.
The tug backs to port. Meaning, that when the rudder is centered and while going backwards, the tug will drift to port. Why? In reverse, the propeller is turning counter-clockwise and the blades of the propeller are grabbing the water on the port side and is pulling the stern to port. To mitigate this, turn the wheel to starboard about halfway or one-full revolution from center.
Steering Tip #2: Center the rudder or turn a bit to starboard and use the bow thruster to steer the boat while in reverse.
Slow speed handling skills are the ones to practice and master. Do not become dependent on the thrusters. They are good for fine tuning - not doing the main work because these are small and powered with 12 volt motors. The stern thruster is particularly marginally effective.
The Ranger Tugs have narrow rudders which causes them to be slow to respond at low speeds. Effective steering and making tight turns at slow speed is done using a combination of the rudder all the way to port or starboard and applying the engine at idle speed. When wind or current makes using idle speed insufficient, Surge the engine by giving a short burst of throttle and quickly moving back to idle and neutral. Boats are not like cars, the stern moves before the bow. It is more like steering a wheel barrow. When surging is used with the rudder hard over, the result is effective, controlled turns.
Tight slow speed maneuvering means:
- Alternating periods of neutral and in-gear while at idle speed,
- Coasting in neutral while turning the rudder hard to port or starboard (anything less will not be effective)
- Applying short bursts of light to medium power is more than idle speed to kick the stern over
- Fine-tune steering with the bow thruster, 2 to 3 second minimums (again, anything less will not be effective)
Steering Tip #1: Use this sequence to make tight and response turns: idle speed in neutral and glide, turn hard over, forward and surge.
Stern Kick. Giving a short burst of power while the rudder is turned hard will kick the stern over to the side before the boat moves forward. The stern kick is a useful tool with docking. Come in at an angle, with the bow very close in, do a stern kick to put the boat agains the dock. Because the propeller turns clockwise while in forward, turns to starboard will be quicker and tighter than turns to port when using the engine surging tactic with a stern kick. In fact, the tug can make a tight U-turn or be "walked" into a dock on the port side of tug by alternating forward then reverse while keeping the rudder hard to starboard and surging the engine.
Know when the rudder is centered. Do this by counting the wheel turns from port to starboard. On Trilogy, the steering wheel makes four full revolutions from side to side. Therefore, to center the rudder, I make two full revolutions from either port or starboard rudder position. Then adjust according after putting it in gear. Tip: Centering the rudder should be one of the steps before going underway.
The tug backs to port. Meaning, that when the rudder is centered and while going backwards, the tug will drift to port. Why? In reverse, the propeller is turning counter-clockwise and the blades of the propeller are grabbing the water on the port side and is pulling the stern to port. To mitigate this, turn the wheel to starboard about halfway or one-full revolution from center.
Steering Tip #2: Center the rudder or turn a bit to starboard and use the bow thruster to steer the boat while in reverse.
Anchoring
I continue to meet boaters who will not anchor. Anchoring is like most boating skills: confidence comes in increments by trying and learning. The rewards in anchoring far surpass the effort to learn this skill.
Anchoring System
Much has been written about proper anchoring techniques. You should learn and study those and then practice with your equipment so it earns your trust. Confidence comes from experience (and some setbacks). We do a lot of anchoring and are confident in our judgment and trust in the equipment.
On Trilogy, the original claw anchor was replaced with a plow-style one because we have consistently had excellent performance with it. Trilogy uses a 10 pound Rocna anchor. Attached to the anchor is 50 feet of chain with a swivel connection to the anchor. Some boaters strongly believe that a swivel connection is the weakest part of the system. I like a swivel because it allows the chain to un-twist in the water. The swivel chosen is heavy duty and the price reflects it. After the chain is 150 feet of stranded rope. The rope is 3-stranded nylon that is strong, lightweight and stretches and is the shock-absorber of the anchor rode. When we are in very shallow water and only the chain is deployed, an snubber is used. The snubber is 6 feet of braided line with a chain hook at the end. The snubber becomes the connection to the boat and acts as the shock absorber. Without a shock absorber, the windlass or cleat is under a lot of stress and there is noise as the chain connected with the bow roller.
How much rode (chain and rope) that is put out is very important. We have not dragged an anchor in the last 15 years of cruising because we use this formula for the amount of rode to put out:
- Determine the depth and add the number of feet to high tide;
- Plus 7. This is the height in feet between Trilogy's sonar transducer in the hull to the anchor roller on the bow. And
- Multiply the result by 3 to 4 when the wind is 15 MPH or less), or 5 to 7 (for winds higher than 15 MPH). For a 30 minute long lunch stop on a calm day, multiply by 2.
- When the conditions get tougher, put more rode out.
Anchoring Tactics (before anything is dropped overboard)
Without a clear set of tactics there will be mistakes. We have made most of them. Again, do you own research and learning. Here is what I do:
Without a clear set of tactics there will be mistakes. We have made most of them. Again, do you own research and learning. Here is what I do:
- Plan on not doing the anchoring process at night. Do it when you can see and assess the environment.
- Know beforehand: the wind forecast, what affect currents will have, when is high tide, what is your minimum depth (how deep is the boat with a buffer zone) and your maximum depth which is determined by how much rode you have,
- Scout our the anchorage first, then decide where to drop the anchor. Stay away from channels, navigation aids, shoals and mooring buoys. Choose a location that has protection from both wind and wakes.
- Watch the depth. On your chart plotter, use the visual sonar mode rather than a digital readout. Sonar will read through the grass and the silt. Digital numbers may not and will give a shallower reading which may cause you to put out less rode.
- Based upon the above formula, determine the amount of rode to deploy,
- Line up behind other boats and be at the mid-point between boats,
- Be prepared to start over again if too close to others,
- Use idle speed and steer upwind, select a spot, drop anchor to the bottom ("footing it"),
- Pay out rode while alternating between idle speed and neutral to drift in reverse,
- The anchor is set when the rode is tight followed by the boat moves slightly forward to loosen the tension,
- Watch the background for 20 minutes for movement. My mantra: "Good for 20 minutes means it is good for 20 hours."
LIVING IN THE WORLD OF 12 VOLTS
There are three areas of the world of 12 volts to learn about: generating power, storing power, and wisely using power.
On Trilogy, power is generated by the alternator on the engine and it takes about 4 hours for it to fully charge a battery that is down 25%. Power is also generated by the solar panel and it generates about the same amount as the refrigerator uses in a day. With no power is being used, the solar panel will keep the batteries fully charged for weeks. Some boats have a independent generator that creates 120 volt power. Our tug and most smaller boats do not. The last option for generating power is getting 120 volt power from a shore power connection. The battery charger converts 120 volt alternating current to 12 volt direct current to charge the batteries. On Trilogy, the battery switches must be turned on for the banks to be charged. This is different from the earlier models of Ranger Tugs.
Storing Power is about batteries. The two AGM house batteries can supply the tug at anchor for 48 hours if the 12 volt DC power is managed. Battery storage capacity is measured in amps and every battery has a label on with the Amp hours (called Ah). The bigger the house battery bank, the more amps are available. If the batteries are not healthy (old, low water in flooded batteries, bad charging, too many discharges) this will weaken the storage capacity.
Wisely Using Power means turning off all the 12 volt circuits that are not being actively used. The Garmin components and the NEMA 2000 network uses considerable amps by themselves. The refrigerator is the appliance that consumes the most power. Refrigerator Tip: Test the door seal for leaks by pulling a paper towel when the door is closed. If it comes out easily, you have a problem.
An inverter is a wonderful way to get 120 volts from a 12 volt system. However, an inverter can bring a battery down fairly quickly. Be very cautious about using an inverter when the engine is not running. Inverters create the voltage needed by a device. Manage power by NOT leaving the inverter on when it is not needed.
f the anchor light is not an LED bulb, it will also be a consumer. While at anchor and if I am concerned about battery usage, I will not leave the depth sounder working. In 16 hours at anchor, the battery level is often at 75%.
Device Charging Tip: Plan on the charging of phones, computers and other devices while the boat is underway. Use the inverter while the engine is running. The engine's alternator will do all the charging while taking you to the next destination.
Remember, with AGM and flooded batteries, you do not have 100% of the amperage available, you only have 50% available.
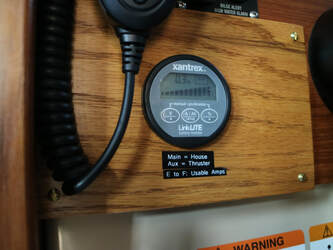
Battery Tip: Install a Battery Monitor that continuously measures amperage or amps available. Measuring voltage gives a rough estimate and is a guide. Roughly, 12.8 volts is fully charged, 12.2 volts is 50%, 11.1 volts is poor health, 10.8 volts the battery is discharged. Monitoring amperage is better. This is a great tool to learn exactly what is consuming power and how much. This knowledge will help you manage the boat's power supply.
A huge user to the house battery is the anchor windlass. All electric motors use more amperage than nearly anything else. Pulling in 200 feet of rode under a strain will quickly draw down the house battery bank if the engine is not charging it.
Windlass Operating Tip: Start the engine 15 minutes before pulling the anchor leaving the gear in neutral and run the RPM's to about 1400 which is about where the alternator is putting out maximum voltage output - the volt meter should read 13.5 or higher. Then, use the windlass to pull up the anchor.
Thruster Operating Tip: The thrusters on the Ranger Tugs are small. To be effective, use the thruster in bursts of 2 to 3 seconds. Using the bow and stern thrusters at the same time will quickly tax the battery's voltage. Thrusters may over heat and stop if used for 60 continuous seconds or more.