Maintenance and How-to's
"If you do not take care of it and maintain it, you do not deserve to own it." Captain Lloyd R. Gray, USN
Boats are complex and have more systems than a house does. Think about it, there is the mechanical system to move it, the 120 volt electrical system, the 12 volt electrical system, fresh water system, raw water system, the sewage system, electronics system, the structural system and all the appliances and comforts that we add to it. Put all of that on the water, jostled around on a trailer and out in the worst kind of weather, there will be a constant stream of issues. Fortunately, most of the issues will be minor ones. Brand new boats are often not like brand new cars - they often have issues on day one. As the owner, you really have two choices about maintenance: pay some one or do it yourself. Me, I do 99.5% of the work.
Electrical Issues And Safety Hazards
Of all the categories of maintenance and repairs, electrical issues on a boat are in the top tier of importance. Fires on a boat are often catastrophic. The mix of fiberglass and fuel will make cause a fast and very hot consuming fire. Most of the causes of boat fires are related to the electrical system and these are often preventable by maintenance.
Of all the categories of maintenance and repairs, electrical issues on a boat are in the top tier of importance. Fires on a boat are often catastrophic. The mix of fiberglass and fuel will make cause a fast and very hot consuming fire. Most of the causes of boat fires are related to the electrical system and these are often preventable by maintenance.
Shore Power Connection System
The shore connection system can cause a fire when it is failing. The signs and symptoms of an issue that needs immediate attention are: (1) a plug is broken off, (2) black charring around a plug or a socket, (3) the cord is torn, split or broken, and (4) the cord is warm to the touch.
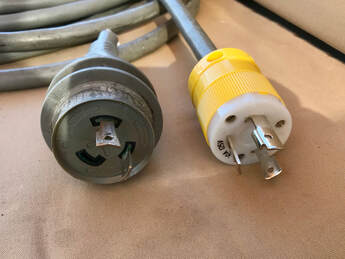
The plug to the dock pedestal. This photo is before and after a repair. When I removed the block from a dock power pedestal, one of the three prongs broke off. The plug was cut off and replaced with the yellow one. A simple and straightforward repair using the directions from the plug.
The shore connection system can cause a fire when it is failing. The signs and symptoms of an issue that needs immediate attention are: (1) a plug is broken off, (2) black charring around a plug or a socket, (3) the cord is torn, split or broken, and (4) the cord is warm to the touch.
The plug to the dock pedestal. This photo is before and after a repair. When I removed the block from a dock power pedestal, one of the three prongs broke off. The plug was cut off and replaced with the yellow one. A simple and straightforward repair using the directions from the plug.
The plug and socket connection on the boat. The weakness of most of these connections is the twist lock and lack of connecting surface area of the plug into the socket. Kept clean and handled carefully the risk is lower. When worn from use, or knocked around and then adding normal corrosion to the mix, electricity has difficulty moving through the connection. This difficulty is called resistance and more resistance creates heat, and heat can cause a fire.
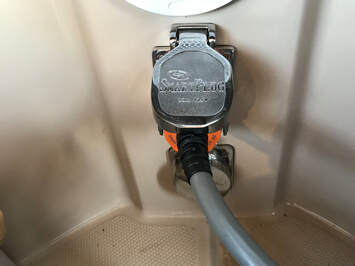
The solution is to replace the plug and the socket mounted on the boat with an improved model that is better engineered. I am a fan of the Smartplug. This product has the very best installation instructions. My scale of difficulty is a 4 on a 10 point scale.
The solution is to replace the plug and the socket mounted on the boat with an improved model that is better engineered. I am a fan of the Smartplug. This product has the very best installation instructions. My scale of difficulty is a 4 on a 10 point scale.
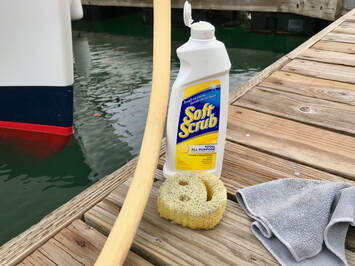
Shore Power Cord. The cord is heavy duty and designed to last a long time. Do not let these cords go into the water and when they do, disconnect the power and rinse them off. Use a Scrotchbrite pad to keep the prongs clean and coat them dielectric grease. I clean the outside of the cord about once a year by first spraying it with a solution of vinegar and water and then using a Scrub Daddy with Soft Scrub to clean it. The cord will pick up dirt from the dock. Keeping it clean will help you examine the cord for issues and will help keep you boat cleaner.
Common Problems With 12 Volt Power.
Boats have two different and separate electrical systems. The most familiar one, because it is the same used on shore, is 120 volt AC (alternating current) that is commonly used for microwaves, electric stoves, heaters, hair dryers, washer and dryer and the like. The second system is 12 volt DC (direct current) and is commonly used in boats for the engine, lights, electronics, many refrigerators, pumps, toilets (heads), thrusters, and electric motors like the anchor windlass. 12 volt power can be stored in batteries and the boat's engine can easily generate it.
When it comes to problems to deal with, the 12 volt system will have more issues. A veteran boater that I met on the Great Loop provided this advice with assessing a problem, "Determined what has changed first." Meaning, if a problem started after cleaning something start by looking at that area. I met a frustrated boater in Florence, Alabama who said his engine suddenly had no battery power to start. I asked him, "What has changed?" He came back in 5 minutes with the problem solved. While cleaning an oil leak, he knocked a ground wire off of the engine block.
A long-time boat mechanic told me that most of the problems with 12 volt are on the ground side of the system. This is especially true when something is not working and when a fuse or breaker is not blown or tripped. Every 12 volt circuit has a hot wire (usually red or yellow in color) and a ground wire (usually black or green in color). I always check the ground wire first for issues. The culprit is often a loose or failed connection. Corrosion is another trouble maker and is common in switches. When there is no power coming after a switch, exercise it before replacing it by opening and closing the switch repeatedly for about a minute.
Battery Maintenance Tip #1: Corrosion at the connections is often the cause of any electrical thing that does not work. Have a small wire brush, sandpaper, scotch rite pad and dielectric grease to service these connections. When a switch does not work, try the simplest fix first by turning off the power to the switch and then exercising it. Turning it off and on about 20 times will often break loose any corrosion that has impeded the flow of power (called resistance).
Battery Maintenance Tip #2: Assessing. Batteries typically last only a handful of years. The more discharges that are more than 50% of amperage will shorten the life. Load Testing is one way to assess a battery. With no charging happening, run the thruster for 10-15 seconds while watching a volt meter to assess its battery. If the voltage is 11.1 or less, change out the battery. For the house bank, use either the anchor windlass or turn on all the devices that use this bank and especially the inverter. There is no good way to load test an engine starting battery for a diesel engine.
Battery Maintenance Tip #3. Do not mix old and new batteries in the same bank. When needs replacing, replace them all with the same make and model. Look for manufacture dates and choose ones that are less than 6 months old.
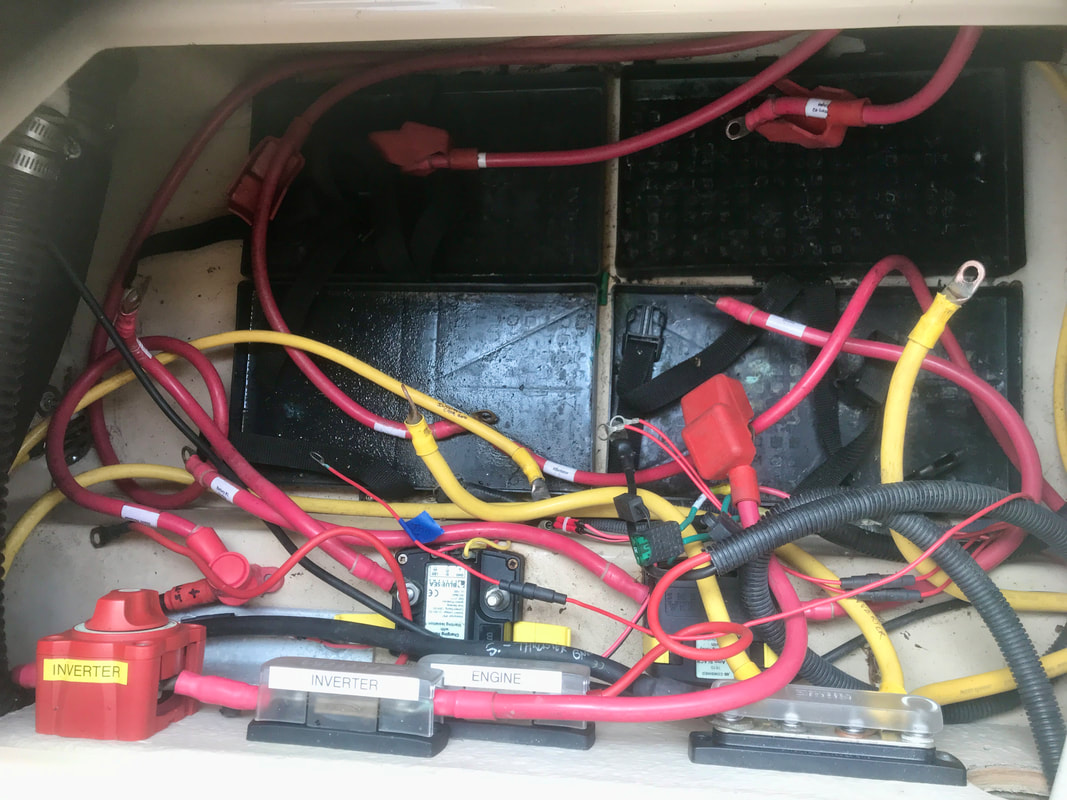
Replacing the Batteries
Batteries work a lot. The ones that serve the house load, the thruster and the windlass go through many cycles of giving up stored amps and then getting them replaced by either the battery charger when connected to shore power or by the alternator when the engine is running. Vibration, heat and cold temperatures will take their toll. Then there is the battle of corrosion that will create resistance or interference of the electrons to get to their destination. Resistance creates work and inefficiency for the battery, connections and cables. Some experts suggest proactively replacing flooded, sometimes called maintenance batteries every two or three years. While AGM (absorbent glass mat) or maintenance free batteries can last a bit longer. Trilogy's batteries were at least 5 years old. It was time.
I also had decided to modify the battery banks. Not that Ranger Tug did anything wrong, I wanted a bigger bank for the biggest uses: House and Thruster. I was persuaded by more knowledgeable people than I to combine the Thruster battery into the House Bank.
When is time to replace the batteries? Before the battery goes dead or at about 10.8 volts. When the engine is slow to crank over, the engine start battery is saying its time for a replacement. When a battery is completely discharged, it does charge all the way back to 100%. Do this a few times and the life of the battery is shortened. For me, the thruster battery was weak. The sign was a load test. I ran the thruster for 30 seconds and watched the battery meter on the breaker panel. It went down to below 11 volts, meaning, it had no reserve or depth of charge.
What types of batteries to use? There are lots of good opinions to listen to and whatever you do, it will work for you. The no-no's: do not mix battery types. Trilogy had all AGM batteries which were fine. The factory installs them in the new boats. I went with flooded batteries. My reasons: (a) I like to maintain things and putting a cup or so of distilled water in a battery every few months is easy. (b) The cost is about 50% less than AGM batteries. (c) I use AGM's when the battery is stored in the living area. Flooded batteries vent hydrogen and can have an odor. On Trilogy, all the batteries are outside of the living area and have access to fresh air. (d) The performance of the flooded batteries are the same as AGM's.
How to do the replacement process? This took the greater part of a whole day.
1. Draw a map of what you have showing what cables are connected to the terminals on all the batteries.
2. Turn off the power at the battery switches and disconnect from shore power. There is still a hazard if a wrench or socket wrench touches both a positive and negative terminal. You have to have you head in the game with no distractions.
3.. Label any cable with a sharpie pen or wire that is not already labeled.
4. Disconnect the cables and fold them out of the way, Then, take out the old batteries. Generally there are handles on the end or in the middle. These typically weigh about 50 pound each.
5. Clean out the battery tray and the surrounding area with vinegar and water.
6. Clean the connection lugs. I used a stainless steel wire brush on a drill motor and this made quick work. I also used coarse grit sandpaper on areas the wire brush could not reach. Then, use a tube terminal grease to coat all sides of each lug.
7. Drop in the new batteries. Use a label maker to name each battery and the month/year it was installed.
8. Connect the red or positive cables. Secure with a flat and a locking washer. Hold off on tightening them. Double-check and look for ones you missed.
9. Connect the yellow or negative cables. Again, loosely secure with flat and locking washer. Double-check and look for ones you missed.
10. Re-check what you have done with the map. All good? Tighten down all the nuts.
11. Re-set the battery charger if you changed the battery type. Use the owner's manual for the charger you have. In Trilogy, the ProMariner battery charger has a different charging profile for flooded batteries from AGM. The owner's manual gave clear directions on how to change the charger's settings. This took about 60 seconds to do.
12. Test everything.
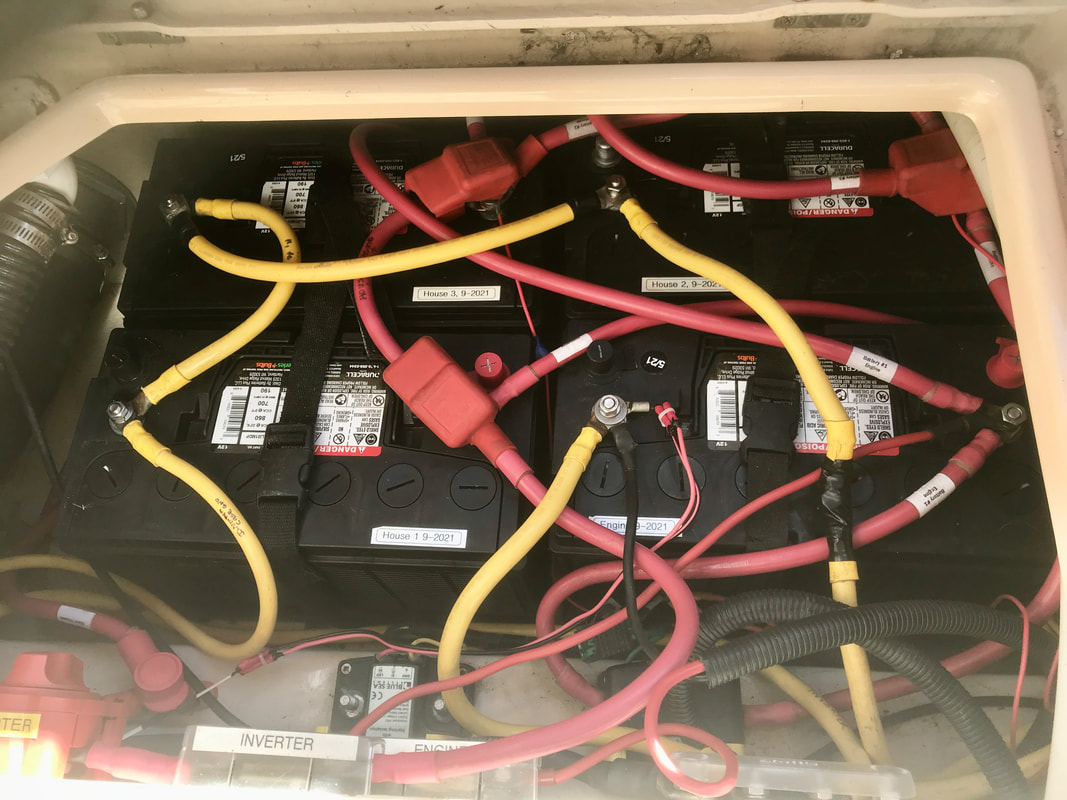
Combining the House and Thruster Batteries
There are several ways to do this. I used the existing red or positive cables to connect the positive terminals of the three batteries together. I had to make up one yellow cable (make-up means buy the cable, cut to length, strip the ends, buy two lugs and crimp them on to the cable - my marine store had the tools on-hand) to finish connecting the three negative terminals together. Then, I followed the map made at the beginning for the remaining connections. Of the two ACR's (automatic charging relays) the one connecting the engine battery to the thruster battery was not needed and was removed. The remaining ACR connects the house battery to the engine battery.
There are several ways to do this. I used the existing red or positive cables to connect the positive terminals of the three batteries together. I had to make up one yellow cable (make-up means buy the cable, cut to length, strip the ends, buy two lugs and crimp them on to the cable - my marine store had the tools on-hand) to finish connecting the three negative terminals together. Then, I followed the map made at the beginning for the remaining connections. Of the two ACR's (automatic charging relays) the one connecting the engine battery to the thruster battery was not needed and was removed. The remaining ACR connects the house battery to the engine battery.
Electronics and Issues
When a electronic component in the system fails, the cause is often a connection. The spin-on connections need to be tight but do not over-tight by using a large tool with lots of leverage. I have experienced sudden failures on the GPS, depth sounder, the radar, the VHF radio and the auto-pilot. All of these were not hardware or software failures, these were connection issues. Small and unseen corrosion gets into the connections of the 12 volt power and the data network cables. Corrosion causes electrical resistance and enough resistance causes the component to stop functioning.
The Fix: For 12 volt connections, turn off the power at the fuse panel. Open the connection and use a Scotch Brite pad or medium grit sand paper to clean the metal connections. Apply dielectric grease to the metal. Electronic connections between devices and the network are fixed differently. Clean the gold plated connections with alcohol and a Q-tip. Clean non-gold metal pins with "Brake Cleaner" that is simply a solvent in a spray can. Allow to dry, then re-assemble. Do not use any coating or grease on electronic connections because these may cause unwanted resistance.
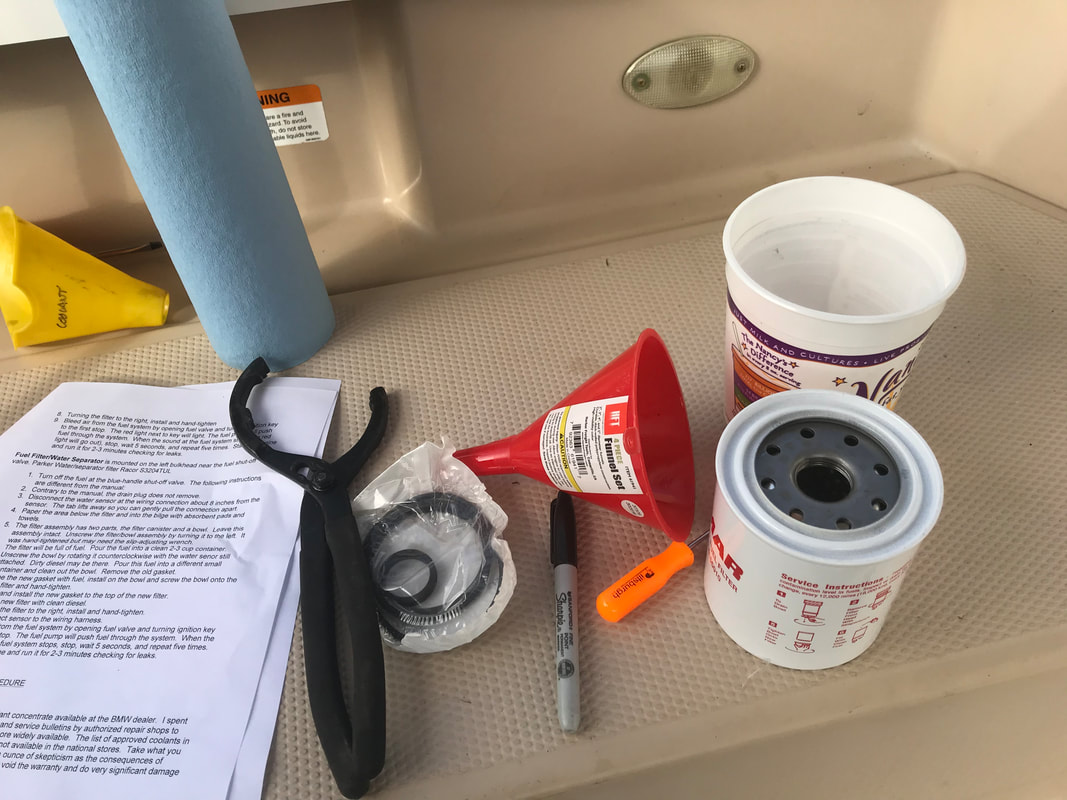
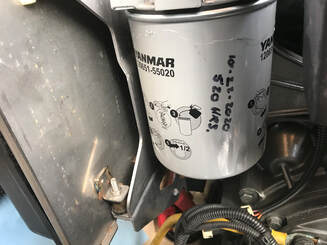
Changing The Fuel Filters
Diesel engines are very reliable when they have very clean fuel. The only way to ensure there is clean fuel is to have clean filters. Change the filters every 250 hours or annually which ever comes first. The Yanmar 180 has two filters between the fuel tank and the engine's injectors. The first one is mounted on the wall of the engine compartment and is the Fuel Filter/Water Separator. The second filter is the fine fuel filter and is mounted on the engine block.
Where to get filters (November 2020 update): Yanmar 120650-55010 (water separating fuel filter-on bulk head) ordered from Lighthouse Marine Distributors, $60. Other options are the Parker Water/separator filter Racor S3204TUL and Baldwin BF46028-0. The fine filter is Yanmar 120651-55020 ordered from American Marine Diesel, $145. Another option for this is the Mann WX 1150/2 filter. Some owners report that this may NOT work without minor alteration to the length of the mounting bolts that occupy the same space.
Tools & Supplies Needed:a roll of blue shop towels, container to receive 2-3 cups of clean diesel fuel, small (1/2 c) container to receive dirty diesel fuel, funnel, 4 absorbent pads, plastic trash bag lining a bucket to receive the older filters and towels, slip-adjusting filter wrench, and an O-ring pick.
Changing The Fuel Filter/Water Separator
Diesel engines are very reliable when they have very clean fuel. The only way to ensure there is clean fuel is to have clean filters. Change the filters every 250 hours or annually which ever comes first. The Yanmar 180 has two filters between the fuel tank and the engine's injectors. The first one is mounted on the wall of the engine compartment and is the Fuel Filter/Water Separator. The second filter is the fine fuel filter and is mounted on the engine block.
Where to get filters (November 2020 update): Yanmar 120650-55010 (water separating fuel filter-on bulk head) ordered from Lighthouse Marine Distributors, $60. Other options are the Parker Water/separator filter Racor S3204TUL and Baldwin BF46028-0. The fine filter is Yanmar 120651-55020 ordered from American Marine Diesel, $145. Another option for this is the Mann WX 1150/2 filter. Some owners report that this may NOT work without minor alteration to the length of the mounting bolts that occupy the same space.
Tools & Supplies Needed:a roll of blue shop towels, container to receive 2-3 cups of clean diesel fuel, small (1/2 c) container to receive dirty diesel fuel, funnel, 4 absorbent pads, plastic trash bag lining a bucket to receive the older filters and towels, slip-adjusting filter wrench, and an O-ring pick.
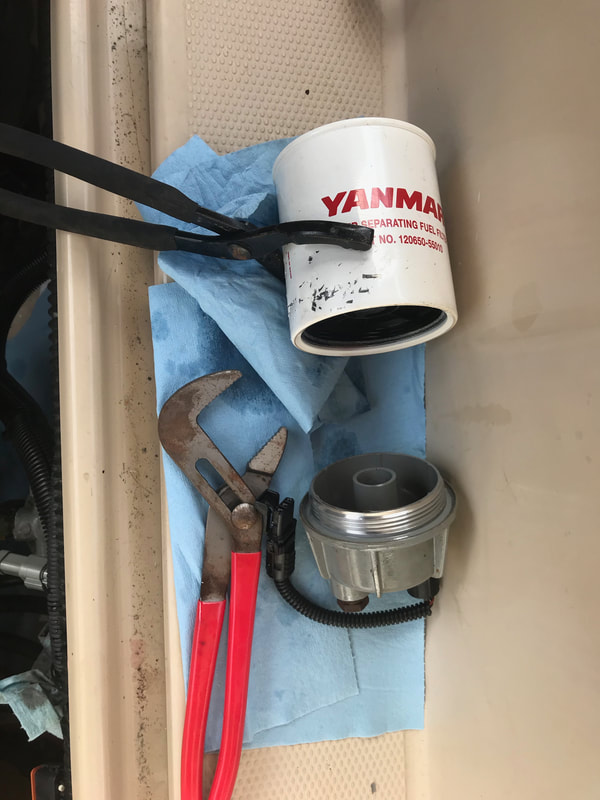
Changing The Fuel Filter/Water Separator
- Turn off the fuel at the blue-handle shut-off valve that is accessed through the small hatch inside the salon and under the door. The following instructions are different from the manual:
- Contrary to the manual, the drain plug below the filter does not get removed.
- Disconnect the water sensor at the wiring connection that is about 8 inches from the sensor. The small tab on the connector lifts away so you can gently pull the connection apart.
- Paper the area below the filter and into the bilge with absorbent pads and towels.
- The filter assembly has two parts, the filter canister and a bowl. Leave this assembly intact. Unscrew the filter/bowl assembly by turning it to the left. It was hand-tightened but may need the slip-adjusting wrench.
- The filter will be full of fuel. Pour the fuel into a clean 2-3 cup container.
- Unscrew the bowl by rotating it counterclockwise with the water sensor still attached. Dirty diesel may be there. Pour this fuel into a different small container and clean out the bowl. Remove the old gasket and make sure it is not stuck on the housing. (My lesson: I did not check for this and installed a new gasket over the old one. Fuel sprayed everywhere.)
- Lube the new gasket with fuel, install it on the bowl and screw the bowl onto the new filter and hand-tighten.
- Lube and install the new gasket to the top of the new filter.
- Fill the new filter with clean diesel from the 2-3 cup container.
- Turning the filter to the right, install and hand-tighten.
- Re-connect sensor to the wiring harness.
- Bleed air from the fuel system by opening fuel valve and turning ignition key to the first stop. The fuel pump will push fuel through the system. When the sound at the fuel system stops and the red light next to the key goes out, stop, wait 5 seconds, and repeat five times. Start the engine and run it for 2-3 minutes checking for leaks. Write the date and hours on the new filter.

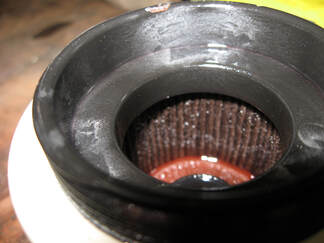
The Fuel Fine Filter is located on the engine
- Turn off the fuel by using the blue-handle shut off valve. Located on top of the tank through the hatch in the cabin.
- Paper the surfaces below the filter with blue towels, as the filter is full of fuel.
- Open the wrapper of the new filter, put the gaskets aside, have it nearby on blue towels with a funnel installed.
- This was only hand-tightened and should come off with the slip-adjusting filter wrench. Turn filter to the left, which is counter clockwise, if looking at it from the bottom to the top.
- When the filter comes off, pour the diesel into the new filter using the funnel.
- Make certain the old rubber gasket came off, as it may stick to the engine side and cannot be seen. A double gasket will cause fuel to spray out when starting.
- Lube the new gasket and install it on the new filter.
- Turning the filter to the right, install and hand-tighten
- Bleed air from the fuel system by opening fuel valve and turning ignition key to the first stop. The red light next to key will light. The fuel pump will push fuel through the system. When the sound at the fuel system stops (the red light will go out), stop, wait 5 seconds, and repeat five times. Start the engine and run it for 2-3 minutes checking for leaks.
What does a clogged fuel filter look like?
I experienced this clogged filter on Lake Powell in Utah. When the trip started, the filter was due for a preventative changing in about a 100 engine hours. After about 16 engine hours after filling the tank at Page, Arizona, the engine would only idle. Give it throttle and the engine stopped. That is a sign of clogged fuel filter. I had to be towed to the boat ramp which was my good fortune of being close by because I did not carry a spare fuel filter.
Tip: Carry a spare filter, the tool to change it and a written procedure to use.
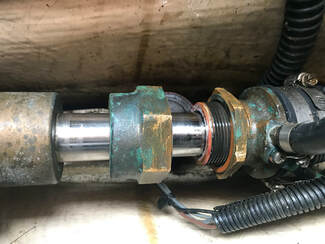
The Packing Gland
The packing gland is the watertight connection between the turning propeller shaft and the hull of the boat. This connection gets hot from friction and therefore must be cooled with water. Typically there are products to accomplish the cooling. One, is a dripless seal where water comes in and flows out in a closed system. The second one, is the decades old traditional one of a packing gland. This type is on our Ranger Tug. This photo shows the two parts of the packing gland: the larger compression nut and the thinner locking nut with the the exposed threads. The gland is manually tightened to so no or very, very little water drips when the prop shaft is still and drips about 4 to 8 drips per minute when the shaft is turning. A wet bilge is normal and expected in this system. I have had both systems. The dripless system is nearly maintenance free as long as water is circulating through the system. Clogs can happen in the raw water system and the failure is quick and the fix is expensive.
The traditional packing gland takes no minimal maintenance. Simply ensure the right number of drips is happening and adjust according. When the adjusting nut cannot be tightened any further, the wax impregnated stuffing is replaced. Adjusting the packing gland and replacing the stuffing can be down by the owner. The tools needed to adjust the packing gland are two large adjusting wrenches. These are found in the plumbing department at hardware stores. Steps to adjust the packing gland:
- Loosen the thin locking nut by turning toward the port side of the boat. Use a pipe over the handle of the wrench if it will not move. If that does not work, soak the threads with Liquid Wrench or any penetrating oil for several hours or even a day.
- Tighten the large compression nut by hand and then a very short turn with a wrench. I have found turning the length of one notch or shoulder on the nut is more than adequate.
- Tighten the locking nut.
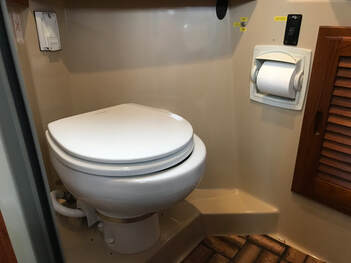
Repairing The Head & Converting To Freshwater
When the head fails, it is a show-stopper and will stop a cruise in its wake. The 2012 Ranger 27 came with an electric head made by Jabsco. For 6 years it performed fine. This head had one 12 volt motor that did two tasks: pump in fresh water and pumped out the contents into the holding the tank. The engineering used a belt to do both jobs. The weakest link in the system, called the point of failure, was the belt. Of course, the belt broke while on a long cruise - we were on the Erie Canal - and the impossible task was finding a replacement belt. 6 years after manufacture, the belt was not available. Not anywhere. This was not my first headache caused by Jabsco's poor engineering. So much so, that given a choice between similar products, I do not choose the one made by Jabsco.
A simple fix turned into a full replacement of the head. My go-to experts in marine sanitation issues is a wonderful small company located near Lake Union in Seattle: Marine Sanitation and Supply (here is their website). They immediately knew what the issue was and the perfect replacement model made by Dometic. The Dometic engineering was different: two smaller electric motors and no belt. The replacement was an all-day job because of the very tight spaces under the floor and making a clean install of the new electric switch. In the photo, the new switch is above the toilet paper roll.
The next evolution of this repair was converting to fresh water from sea water. Why? Two reasons: the ongoing smell and staining caused by salt water in the toilet and while underway, the engine took all the sea water. The fix was to use the faucet/shower head to put in fresh water.
How to do this? First get the supplies. Marine Sanitation and Supply sold a 12 volt water valve (really a solenoid), the local marine store sold a length of water supply tubing, a T fitting and three hose clamps. I cut into the fresh water line at the back of a cabinet, put in a T and ran the supply line to the head where the electric water valve was and this connected to the toilet. That was it. The old sea water hose was pulled back into the engine room, removed from the sea strainer and plugged.
Maintenance Of The Head. The toilet fixture and the moving parts need little if any maintenance other than keeping it clean. The large specialty hose that goes to the holding tank will need replacing when it smells like a sewer. Wipe the hose with water and a clean cloth and smell it. No odor - it is fine. The holding tank is another matter. Do not let if overflow. The level of the holding tank in this Ranger 27 is done by looking at the side of the tank. Simple, if you do it. Some owners install a charcoal filter in the vent line to minimize the smell when the head is used. I routinely add a some No Flex Digestor, sold in marine stores, that is used to dissolve the sludge. Flush the tank regularly with water. To remove sludge use a 1/4 cup of liquid dishwasher and run the boat with a half full holding tank. Pump-out, fill again to 1/2 full, and pump out. Also, occassionally use an RV tank wand to put down inside an empty tank to power wash the sides and bottom.
Tip: Use any single ply toilet paper because the macerator can easily shred it.
Tip: Use any single ply toilet paper because the macerator can easily shred it.
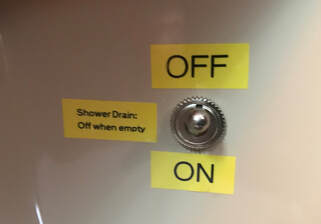
The Shower
Typically the shower stall drains into a sealed plastic box that contains a float switch and a small pump. The same pump make and model that is in the bilge. Generally, the system is pretty reliable provided that the interior of the plastic box, called a shower sump pump, is kept reasonably clean. How to do that? Pour straight vinegar down the drain until the pump cycles on and off. Then, have a cup of coffee and a snack or go out to lunch. When you come back the soaking may have loosened up the crud. Then, run a lot of hot water through the system. Tip: Put a hair strainer over the top of the drain. This reduces the need to manually clean out the interior of the box. But the need will still be there.
Eventually, if the lid of the box is never opened and the interior cleaned, the float switch will get stuck in the off position. One fix: Install a manual switch on the wall. We start the pump shortly after the shower begins and leave it on until we are done. Bilge-type pumps can run dry without damage.
Interior Wood
Most of the interior wood in the Ranger Tug and Cutwater boats do not need any maintenance. The exception is the solid wood teak on the edges of the galley's counter and elsewhere. When this wood was finished only with teak oil, it is prone to water stains. The Fix: sand the wood with 150 grit sandpaper and use Minwax Poly Wipe to put on a durable finish. Shake the can, use a clean cloth and apply a coat using lots of control. No masking or taping is typically needed. After 2-3 hours, lightly sand, wipe away any dust and put an other coat. I like at least 3 coats and high contact areas get 4 or 5 coats. I have done this on a cruise. After the last coat, let it cure for 24 hours. This finish has keep kept its protection and shine for years.
Most of the interior wood in the Ranger Tug and Cutwater boats do not need any maintenance. The exception is the solid wood teak on the edges of the galley's counter and elsewhere. When this wood was finished only with teak oil, it is prone to water stains. The Fix: sand the wood with 150 grit sandpaper and use Minwax Poly Wipe to put on a durable finish. Shake the can, use a clean cloth and apply a coat using lots of control. No masking or taping is typically needed. After 2-3 hours, lightly sand, wipe away any dust and put an other coat. I like at least 3 coats and high contact areas get 4 or 5 coats. I have done this on a cruise. After the last coat, let it cure for 24 hours. This finish has keep kept its protection and shine for years.

Finding and Fixing The Water Leak in the V-Berth
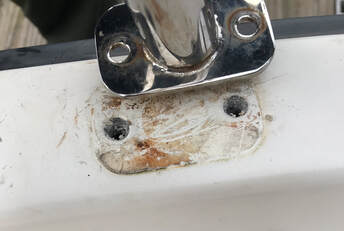
Boats leak above the waterline for a variety of reasons. Every penetration of the deck is an opportunity for a leak and when you add up the number of screws to hold rub rails, cleats, stanchions, and snaps; there are a lot of holes. In another boat, I eventually found the cause of a persistent leak to be holes mistakenly drilled during the manufacture that were not sealed. Every screw and bolt through the deck should be installed with a good sealant and boat manufacturers and pretty good about this. But sealant fails after years of exposure to sun and temperature and that is where maintenance and repairs begin.
The first clue of a problem was water in the V-berth after a rainstorm. The source of the leak was not immediately apparent. My first attack was to remove the dozen screws in the area the hold the rub rail to the hull and re-seal them with 3M 4200 sealant. The next rainstorm and the leak was still there. The second attack was to remove the two bolts that secured the rail stanchion - see the photo on the left. This required the removal of the ceiling panel in the V-berth. Those screw heads were covered with a vinyl lid that snaps open at the top of the screw head. The nuts are 7/16" and removed with a deep socket while holding the bolt on the inside with the correct sized square drive on the outside. With the bolts gone, the old sealant was removed by drilling out the hole, scrapping and using Acetone. Again, 3M 4200 sealant was used to re-bed the stanchion.
Trim Tabs.
The trim tabs are mounted on the transom and provide the means to trim the boat side to side and to push the bow down. Trimming the boat will make a more comfortable and efficient ride. The Ranger Tugs are normally heavier on the port side because there is more usable storage space on that side and all the batteries are on the port side. At the fast cruising speed in flat water, putting the bow down will gain another knot or two in speed and have better fuel efficiency. The trim tabs are connected to a hydraulic pump that is controlled by a set of spring-switches at the helm. The maintenance is minimal: check the fluid level in the reservoir under the pump. There should be 2" of fluid. The Bennett Trim Tab system uses any brand of automatic transmission fluid. To add fluid: remove the Lexan top with the single screw. The filler cap is in the upper left hand corner. Use a funnel with long neck to add fluid. The system does not use fluid so adding fluid is rarely done; unless there is a leak.
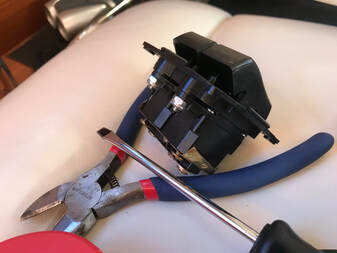
When my trim tabs stopped working, the troubleshooting was fairly easy. The sound of the pump was heard when the spring switches were depressed so it was not an electrical issue and the pump was operating. Bennett's troubleshooting procedures in their manual was specific and easy to follow. The control switch unit was removed and certain colors of wires were connected together - then the trim tabs worked. The conclusion was at the switches had failed. The fix: replace the switch unit for about $70 from an online source. What causes the switch connections to fail? They wear out or there is corrosion. Tip: If there is no power to the switches and the breaker has not tripped, some installers have left the 5 amp in-line fuse that comes from Bennett and is about 24" away from the switches.
The trim tabs are mounted on the transom and provide the means to trim the boat side to side and to push the bow down. Trimming the boat will make a more comfortable and efficient ride. The Ranger Tugs are normally heavier on the port side because there is more usable storage space on that side and all the batteries are on the port side. At the fast cruising speed in flat water, putting the bow down will gain another knot or two in speed and have better fuel efficiency. The trim tabs are connected to a hydraulic pump that is controlled by a set of spring-switches at the helm. The maintenance is minimal: check the fluid level in the reservoir under the pump. There should be 2" of fluid. The Bennett Trim Tab system uses any brand of automatic transmission fluid. To add fluid: remove the Lexan top with the single screw. The filler cap is in the upper left hand corner. Use a funnel with long neck to add fluid. The system does not use fluid so adding fluid is rarely done; unless there is a leak.
When my trim tabs stopped working, the troubleshooting was fairly easy. The sound of the pump was heard when the spring switches were depressed so it was not an electrical issue and the pump was operating. Bennett's troubleshooting procedures in their manual was specific and easy to follow. The control switch unit was removed and certain colors of wires were connected together - then the trim tabs worked. The conclusion was at the switches had failed. The fix: replace the switch unit for about $70 from an online source. What causes the switch connections to fail? They wear out or there is corrosion. Tip: If there is no power to the switches and the breaker has not tripped, some installers have left the 5 amp in-line fuse that comes from Bennett and is about 24" away from the switches.
Fender Maintenance
The fenders are some of the unsung heroes who take a lot of abuse while protecting the gel coat from our mistakes. I keep two styles of fenders aboard, the cylinder shaped ones for normal docks and a pair of round ball fenders for the special circumstances like rafting to another boat or tying to a lock or a steel barge. For the Ranger 27, the G-5 model by Polyform is a great product. There are two cylinder fenders on each side of the boat, tied to the rail, and ready to be deployed. A fifth fender is for the middle and kept is stored and deployed when needed especially if the wind is higher and the boat is being pinned to the dock. This fifth fender is hung on the fittings that the step ladder uses - see the modifications page for more details.
Maintenance is cleaning and keeping the fender properly inflated. Regularly cleaning the fender will minimize the gelcoat from being scuffed by the dirt and particles that get embedded in the fender. Spray the fender with a mixture of vinegar and water and scrub with a Scrub Daddy. Rinse and wipe the fender dry. Put air into the fenders by using a pump that is used to an inflate air mattress. Use a flat bladed screw driver to remove the white colored plug. Use an attachment to the pump that fills the tapered channel. At the end of the channel is a one-way valve. Do NOT use a needle that is used to inflate a ball because it will destroy the one-way valve. Pump to air until the fender is hard but you can dent the side about a 1/2" with your thumb. The white colored plug will keep the fender inflated.
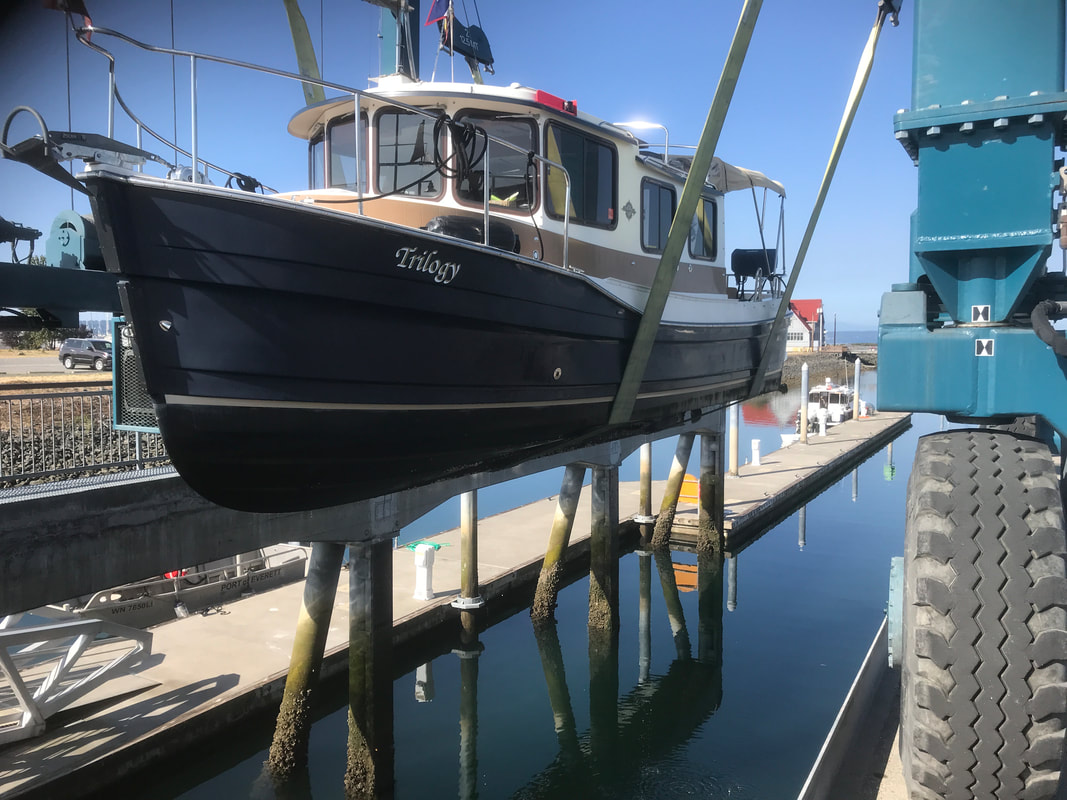
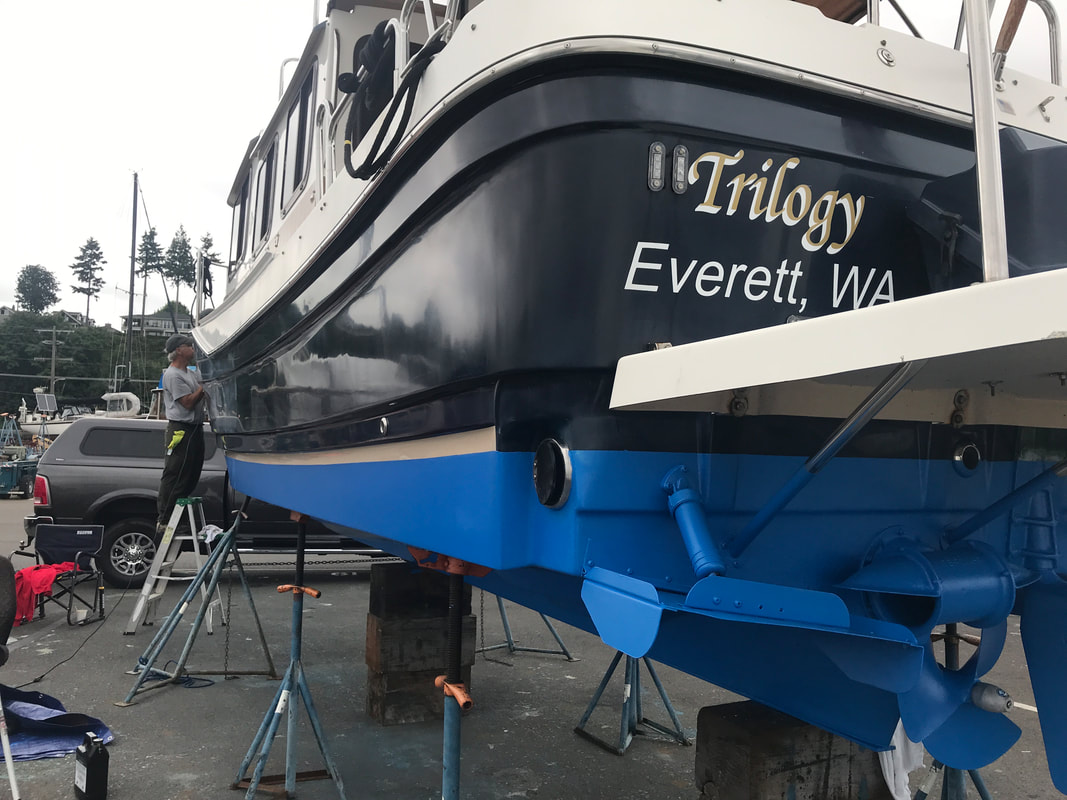
The Bottom and Hull
The goal: "My, she has a nice looking bottom."
The condition of the bottom is often taken for granted until it calls your attention. Trilogy is the salt water most of the time and is target for marine life to start their neighborhood. Bottom paint is essential. We had boats that resided on their trailers and were never bottom painted. What are the signs that it is time to take care of the bottom? Performance that indicates that water is facing resistance on the bottom. These indicators are more apparent at the tug's fast cruising speed of 3,600 RPM's:
- Speed. The tug had slowly lost just over a knot of speed.
- Engine Temperature. The normal temperature is 193 degrees (the thermostat opens at 190) and had risen to 198-199.
- Fuel Use. The normal 7 gallons per hour had risen to 7.6 GPH.
- Engine Load. The normal 81-83% had risen to 87-88%

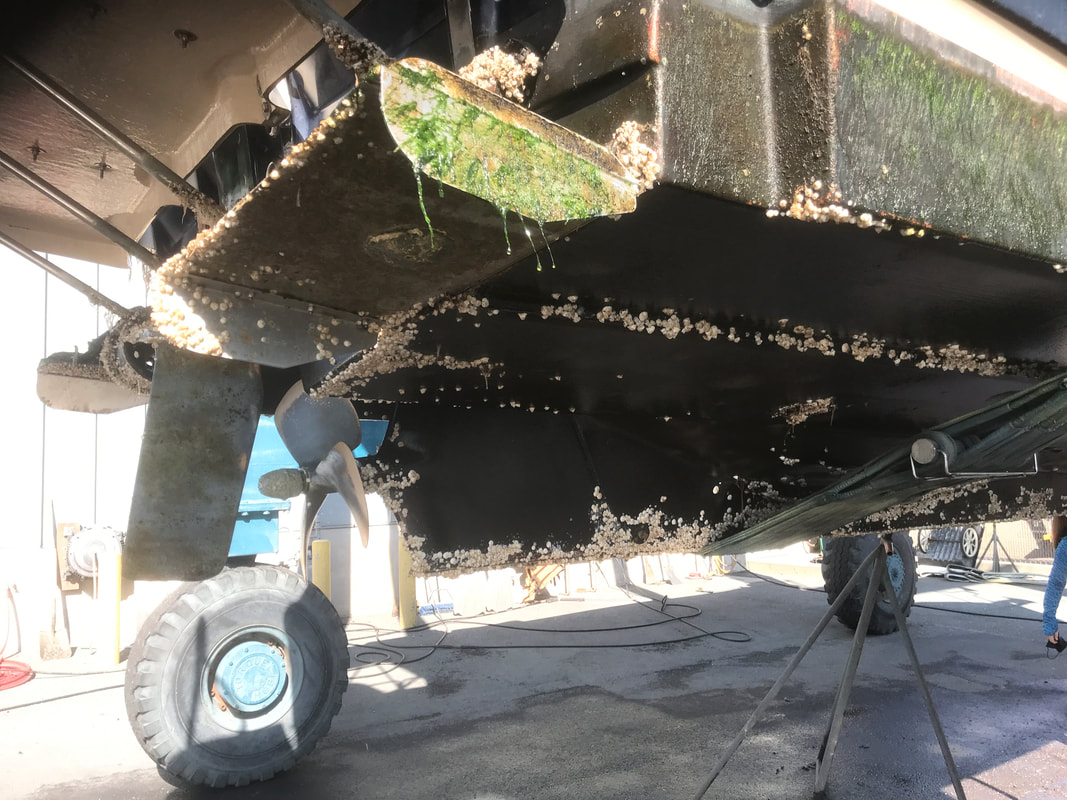
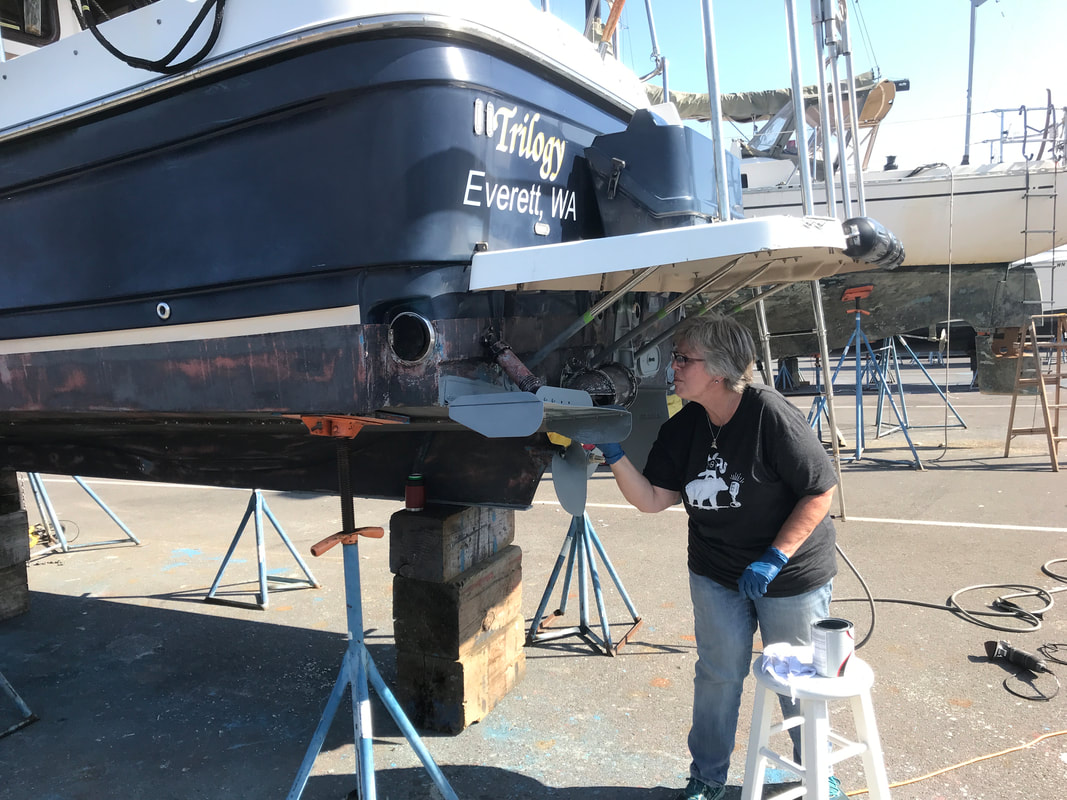
Maintenance. Boatyards said the boat should be hauled, cleaned and painted every two years. As a diver and an owner of a trailer, I clean Trilogy's hull and replace the anodes several times a year. Our previous boat had its bottom paint last 4 years. With proper maintenance, I wanted the bottom paint to last as long as possible. Here are the steps we did:
- The marina staff pressure washed the bottom before setting the tug in the boatyard.
- The first task and the hardest one is sanding the bottom. Using 60 grit sandpaper on an orbital sander that was connected to vacuum cleaner made quick work of this. Wear a good respirator. I copied a trick used by paid people who do this everyday by getting a chair with arms that is on wheels from Goodwill and using this to scoot around under the boat. Laurie hand sanded the small areas on the transom while I machine sanded the rest. The sanding part was done in 4 hours.
- Next, wipe down the hull to remove dust by using a bunch of rags and paint thinner.
- All the exposed metal under the waterline was primed with two coats of Pettit Barnacle Barrier.
- Three thin coats of Pettit Vivid paint was rolled or brushed on, 4 hours between coats and 24 hours before launching. I am not an authority of bottom paint and do not receive any sponsorship from anyone. I used this bottom paint because it work well, but it is very expensive.
- Wash the hull with soap and water.
- Remove stains and prior polish with a mild acid such as FSR (fiberglass stain remover) or Starbrite's On and Off.
- With the oxidation still present, and after testing with 3M's Heavy Duty rubbing compound and finding the oxidation was still there (this is a rare thing), I resorted to the ultimate solution: wet sanding. I have never had to this before. Either the mild acid or rubbing compound had always worked. A professional detailer persuaded me to wet sand and it was easier than expected. With a pan of water and damp cloth close by for frequent use, first use 1200 grit wet/dry. Wet the gelcoat and soak the paper. Sand with a light to medium pressure in fast, swirling motions. Frequently wipe away the water/dust. The paper wears out quickly. When the oxidation is gone, move on. After one side was done, use 2000 grit paper for the mirror smooth finish.
- Rubbing compound with a fast polishing machine. Another detailer saw my work with a random orbital machine and provided a demonstration on how to do this step. Using 3M rubbing compound (they do not make it but buy the best stuff made by others), in a cup with a brush, paint the compound onto the hull in about three foot long sections. Using a 7 inch speed polisher from Harbor Freight with an Arnold 7.5 inch wool buffing pad, also from Harbor Freight, run at high speed with light pressure back forth and up and down until the gel coat shines. Wipe off of the residue with a microfiber cloth.
- Polish. Lots of options here and everyone has their own opinion. I use Starbrite's marine polish and apply two coats.
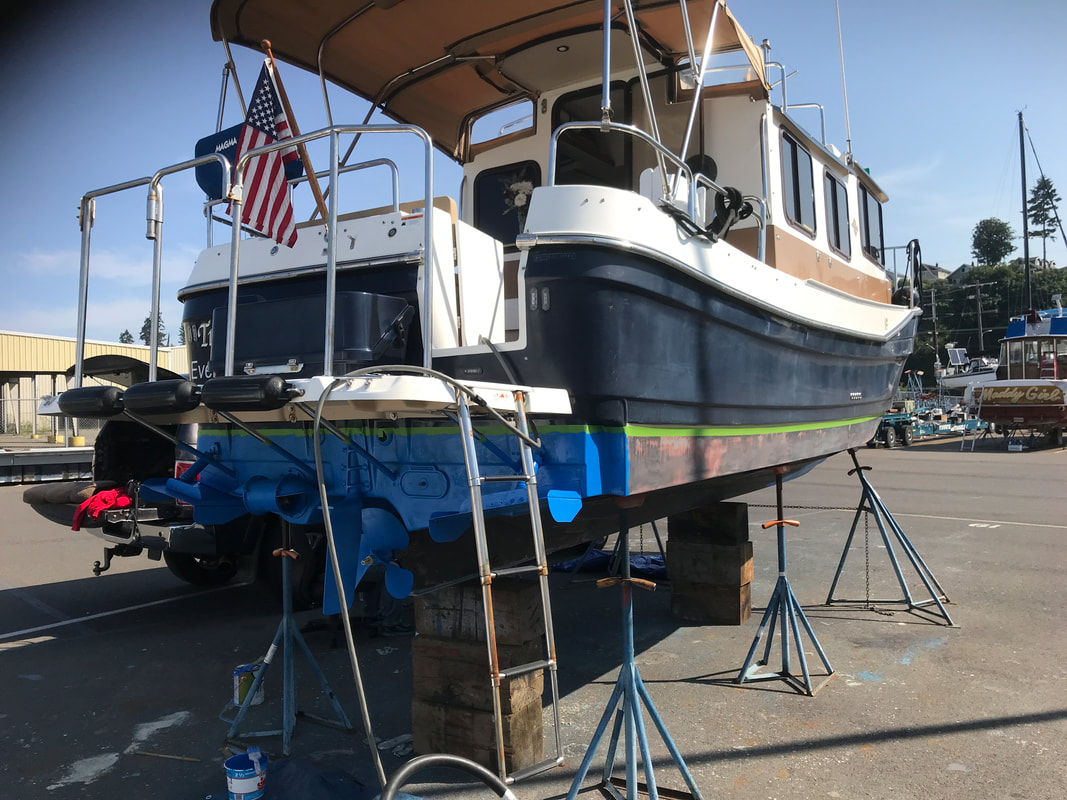
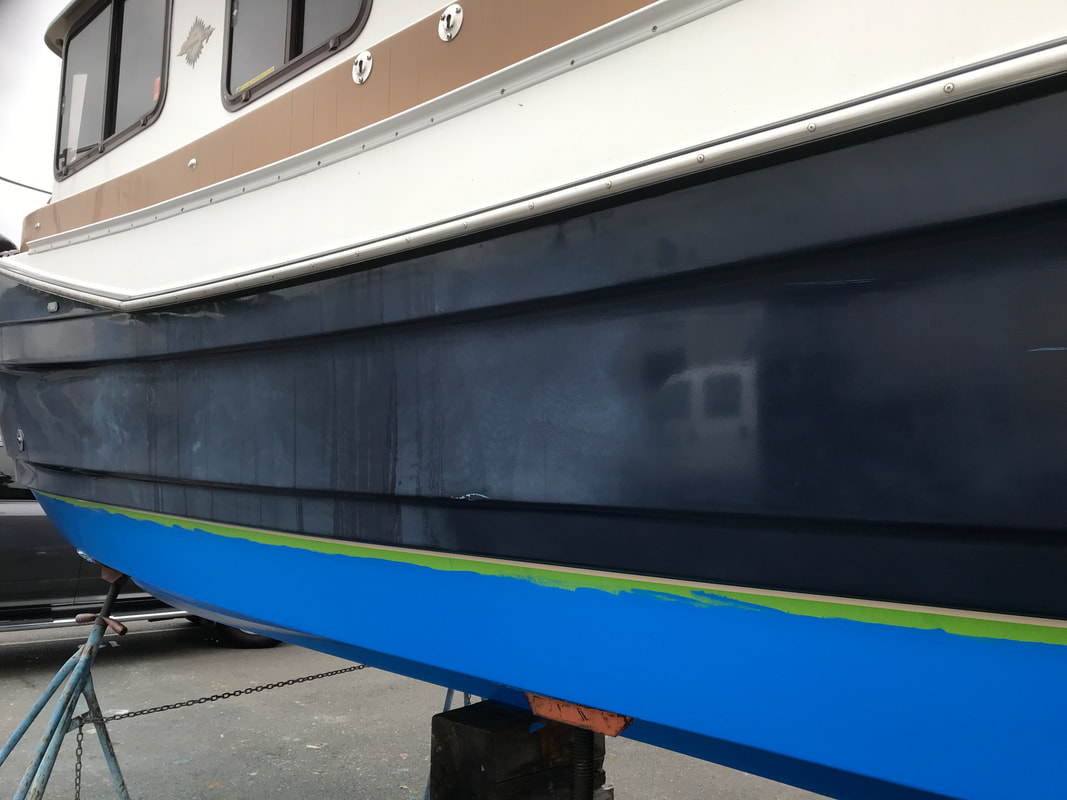
4 days in the boatyard later. This project cost about $1,100 in materials and $600 in haul-out and boat yard fees. We probably saved about $3,000 in labor costs. Here are the "after" photos:


Boat Trailer
The boat trailer is what separates this class of boat from the others. The world of cruising just got a whole lot bigger with a trailer. We live in Seattle, yet, we have cruised extensively on the East Coast, Chesapeake Bay, the Great Lakes, Florida, and Canada's Heritage Canals. Getting to distant cruising grounds is often easier. The Broughton Islands and Desolation Sound are premier cruising grounds in British Columbia. Marina boats will take days to just to get there. We can be in middle of those areas in 12 hours of driving. The trailer is the hurricane plan during that season. You have to care of it for the trailer to care of your boat.
The common issues and the fixes:
- Lights. Corroded wiring connections are the main cause when the lights do not work. This happens due to rain or when the trailer is in the water. Do not use the simple crimp butt connectors. Instead use the butt connectors that have heat shrink tubing. The better ones have sealant inside of the connector. You can add liquid electrical tape before using the crimp connector. After crimping the connection, apply heat by either a heat gun or pencil torch to shrink the tape.
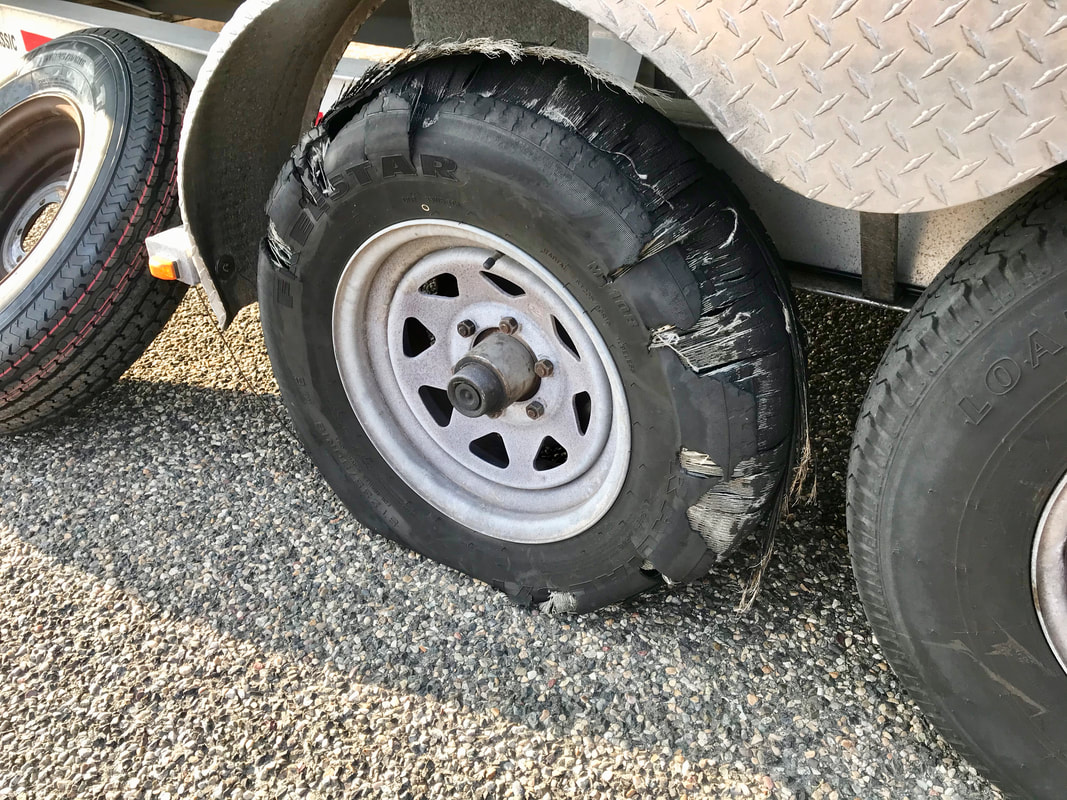
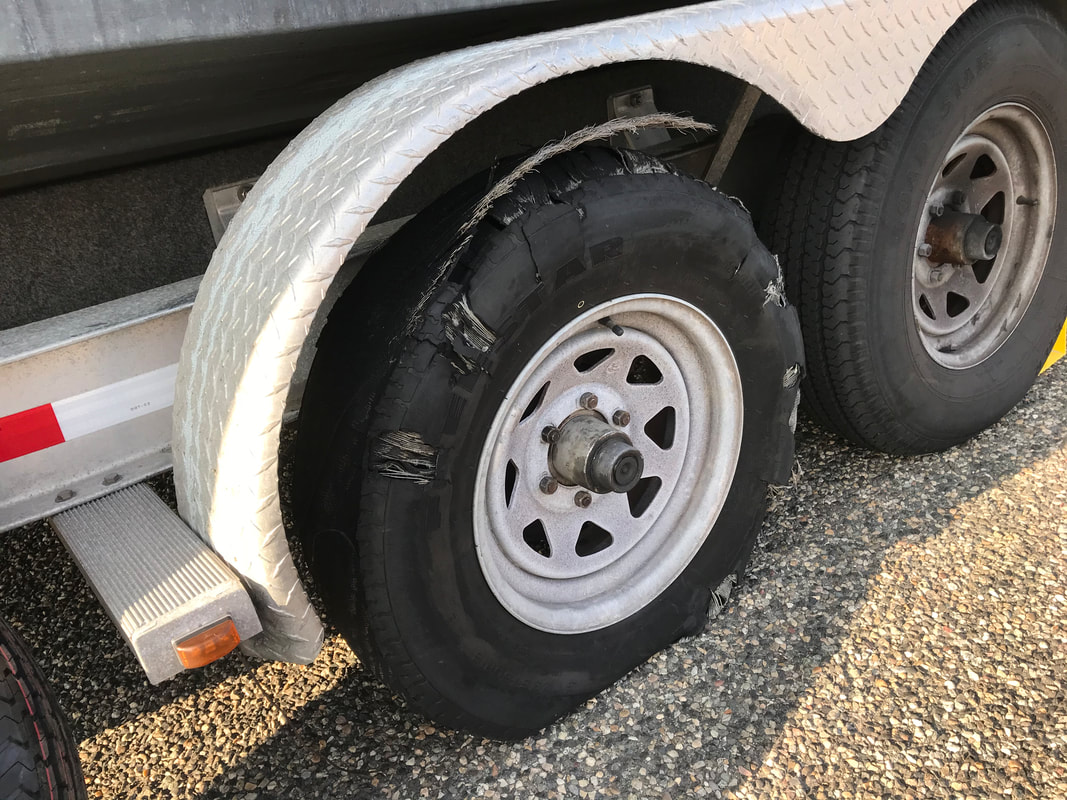
- Tires. Trailer tires are often neglected. Trailer tires are not the same as truck tires because the side walls are more robust. The bad assumption is believe that mileage is a factor - it is not. These HAVE to be replaced every 3 to 4 years because the materials deteriorate before the tread wears out. How to tell the year of manufacture? There is a four digit code stamped into the sidewall, like 3619. The first two numbers is the week of manufacture. The last two digits is the year.
We had a significant event when two tires that looked good dramatically blew out on the freeway about 200 miles a part. The tires was four years old but looked great. All five tires were immediately replaced. When there is a leak due to a puncture, be ready to replace the entire tire when the tire shop refuses to repair a trailer tire.
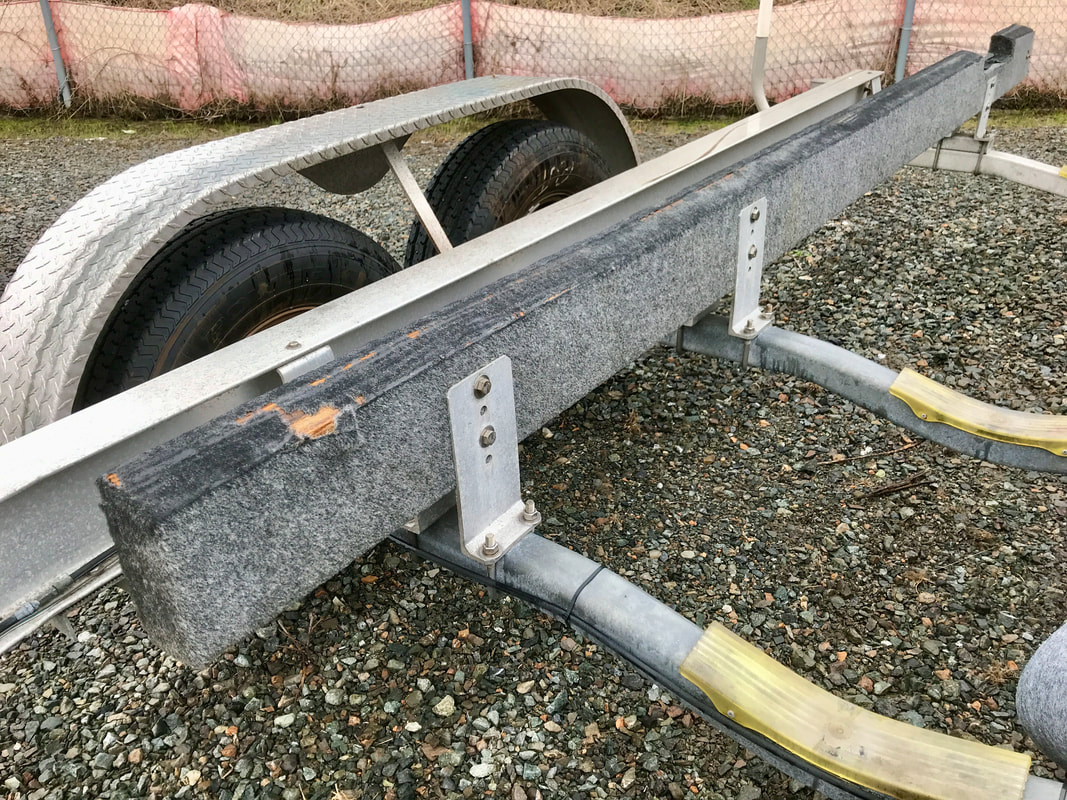
- Bunks. Our Float-On trailer uses wooden bunks that are covered with indoor-outdoor carpet to protect the boat's hull. The carpet wore out. The maintenance is adding new carpet over the old carpet and using stainless steel staples to secure it. The carpet was a roll purchased from Home Depot. The stainless staples were ordered from Amazon. The job of cutting and stapling took about 90 minutes. The photo on the left is before, the photo on the right is after.

Finishing A Complete Re-build. After five years, the brake calipers, bearings, brake lines, and the electric/hydraulic pump with all the accompanying wiring had deteriorated to the point of a mandatory replacement. It was hard work due to frozen bolts, time consuming because parts were not as available due to supply chain issues and expensive. But, I was restoring for all the miles, boat ramps, and trips that the trailer had done for us.